Cardinia Pro
Contents
- Features
- Front Panel LEDs
- Connection Diagrams
- MIDI Router
- On-Air Deck Display
- FAQ
- Open Source
- Firmware Downloads
- Questions?
Features
- Use CDJ-3000 Touch Cue/Preview feature with any mixer
- Sync external MIDI gear with tempo from CDJs
- On-air deck display with compatible non-Pioneer mixers
- USB/DIN MIDI router
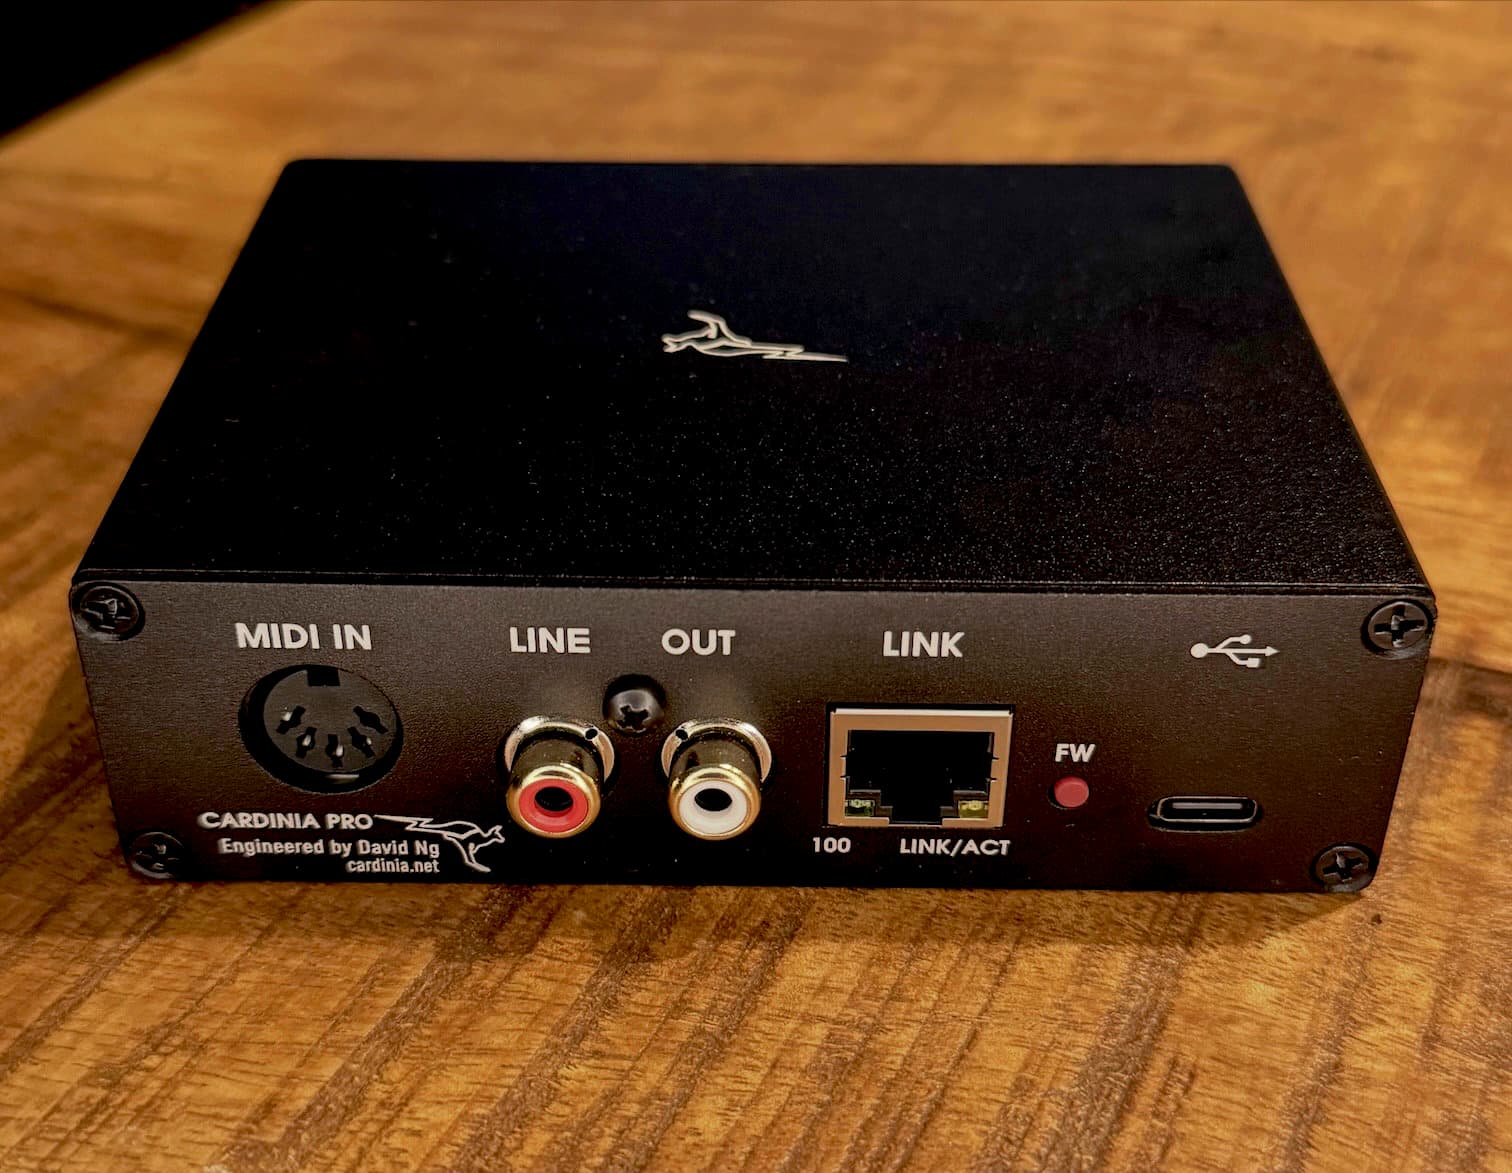
Ports
- USB-C port for power, MIDI and firmware updates
- Ethernet port for link connection
- RCA stereo out with high quality audio converters
- MIDI in DIN port for On-air deck display support with compatible mixers
- MIDI out DIN port to sync external gear
- 4 tri-colour LEDs for status indication
Whats in the box
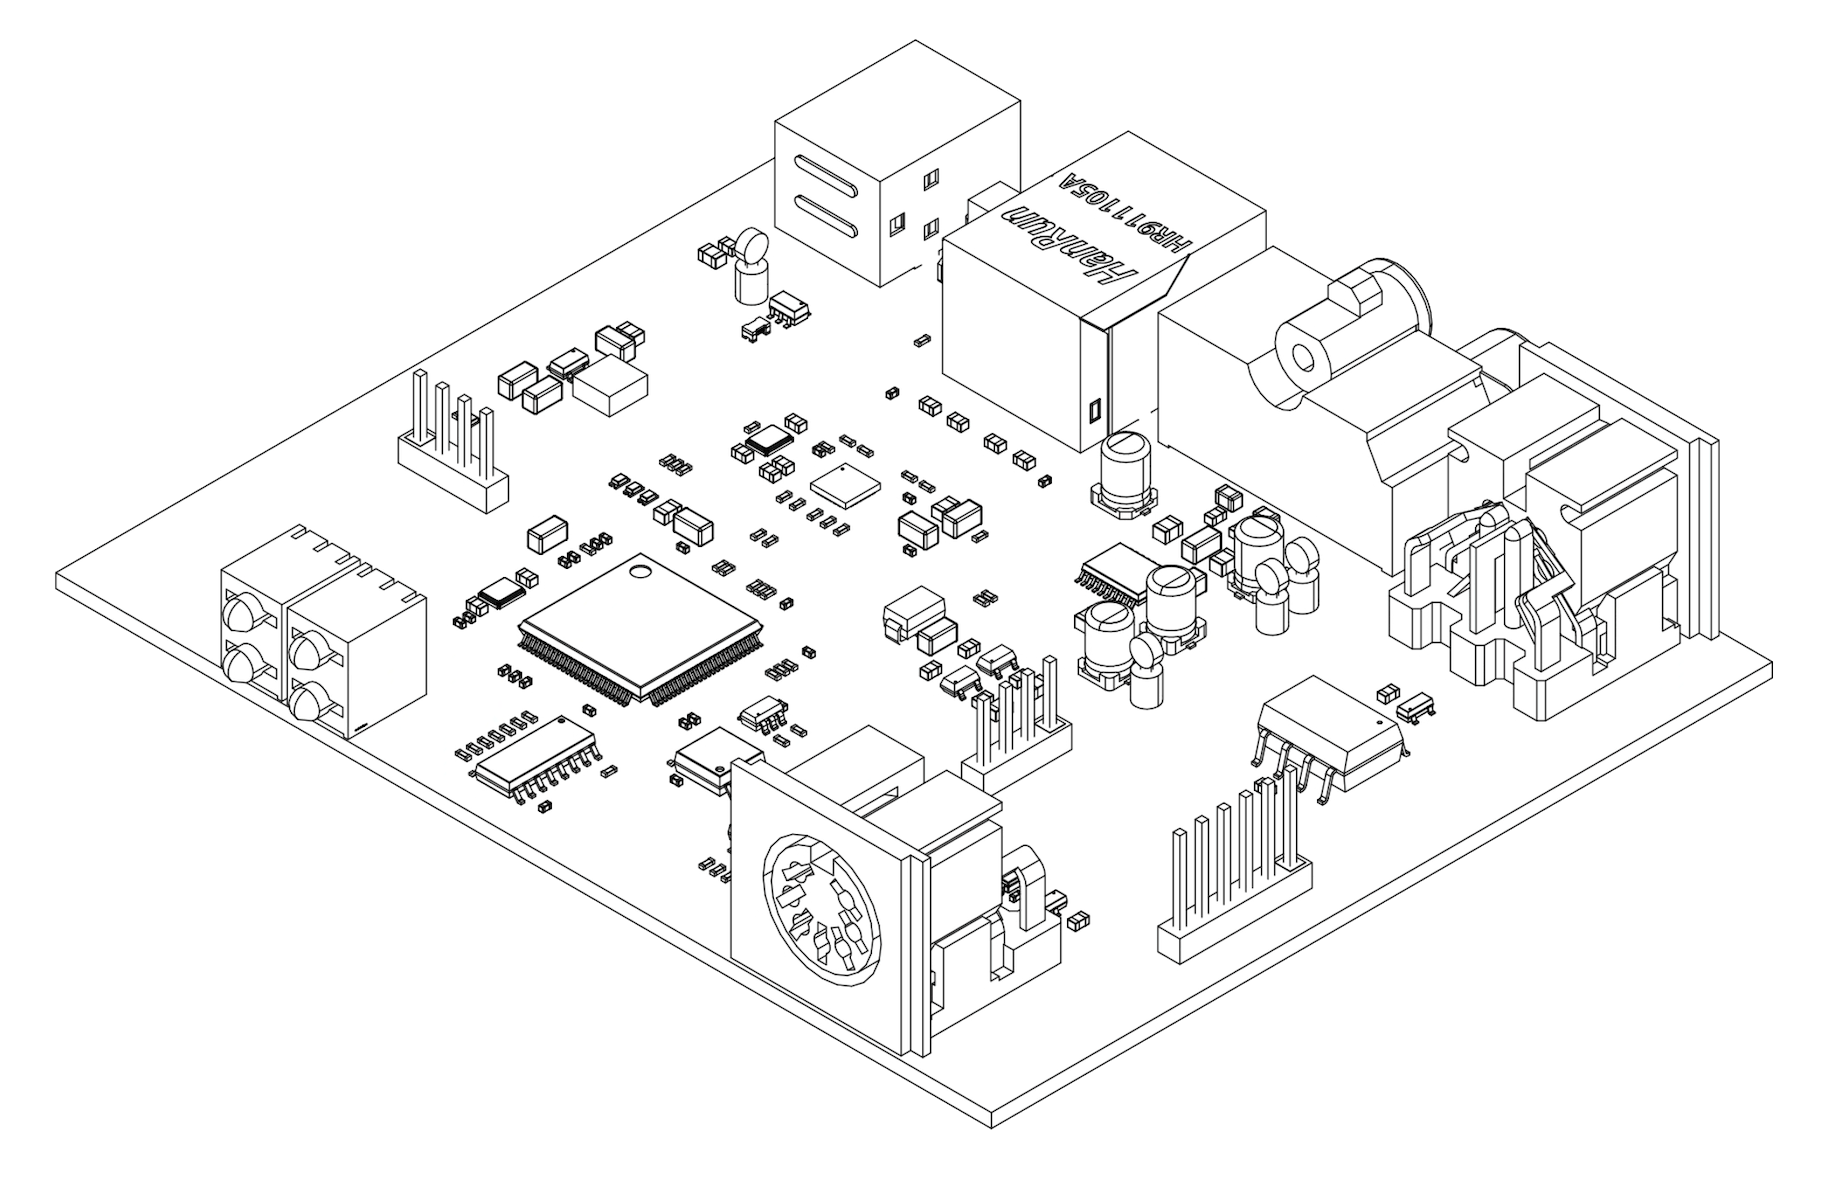
- Cardinia Pro in a black sandblasted aluminium enclosure
- Ethernet cable
- RCA Audio cable
- USB cable
€120-
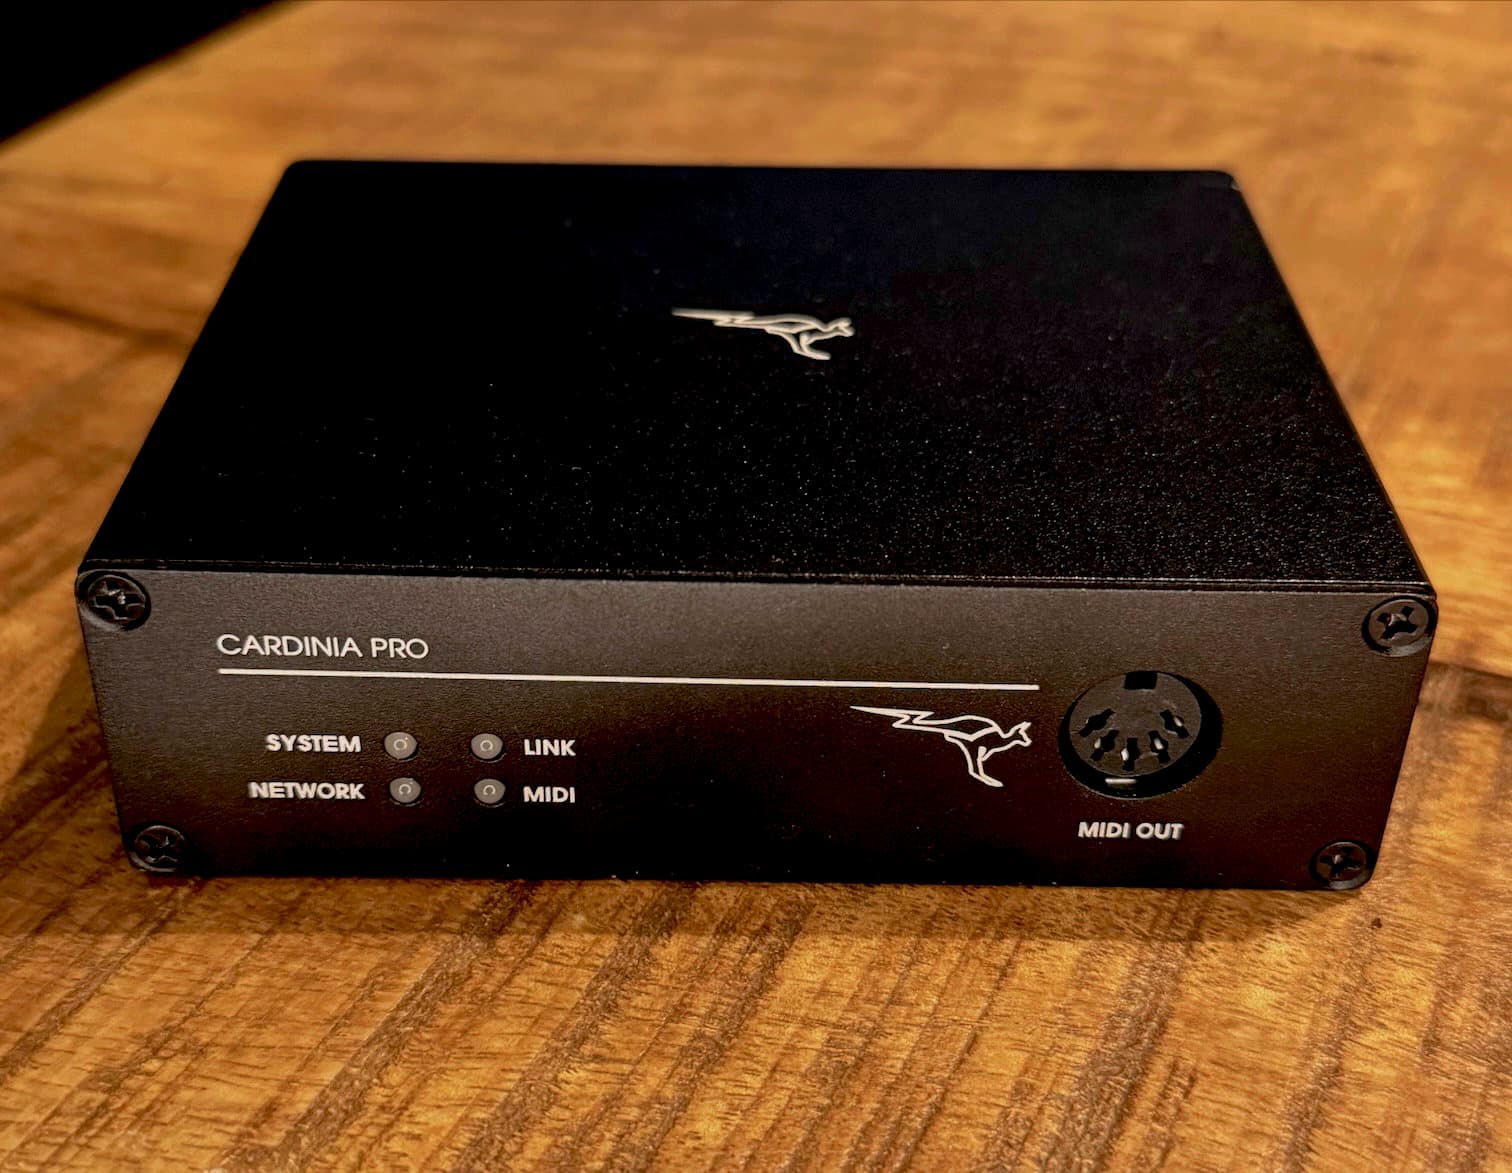
Front Panel LEDs
| System LED | Network LED | Link LED | MIDI LED | |
| System Ready | ☀ Green | |||
| No Network Detected | ☀ Red | |||
| Connecting to Network | ☀ Orange | |||
| Connected to Network | ● Green | |||
| Connecting to Link | ☀ Orange | |||
| Connected to Link with Activity | ● Green with ☀ Orange | |||
| Connected to Link with Mixer Conflict | ● Red with ☀ Orange | |||
| MIDI Auto-start armed | ● Green | |||
| MIDI DIN IN Activity with Auto-start armed | ● Green with ☀ Orange | |||
| MIDI DIN IN Activity with Auto-start un-armed | ☀ Orange |
Connection Diagrams
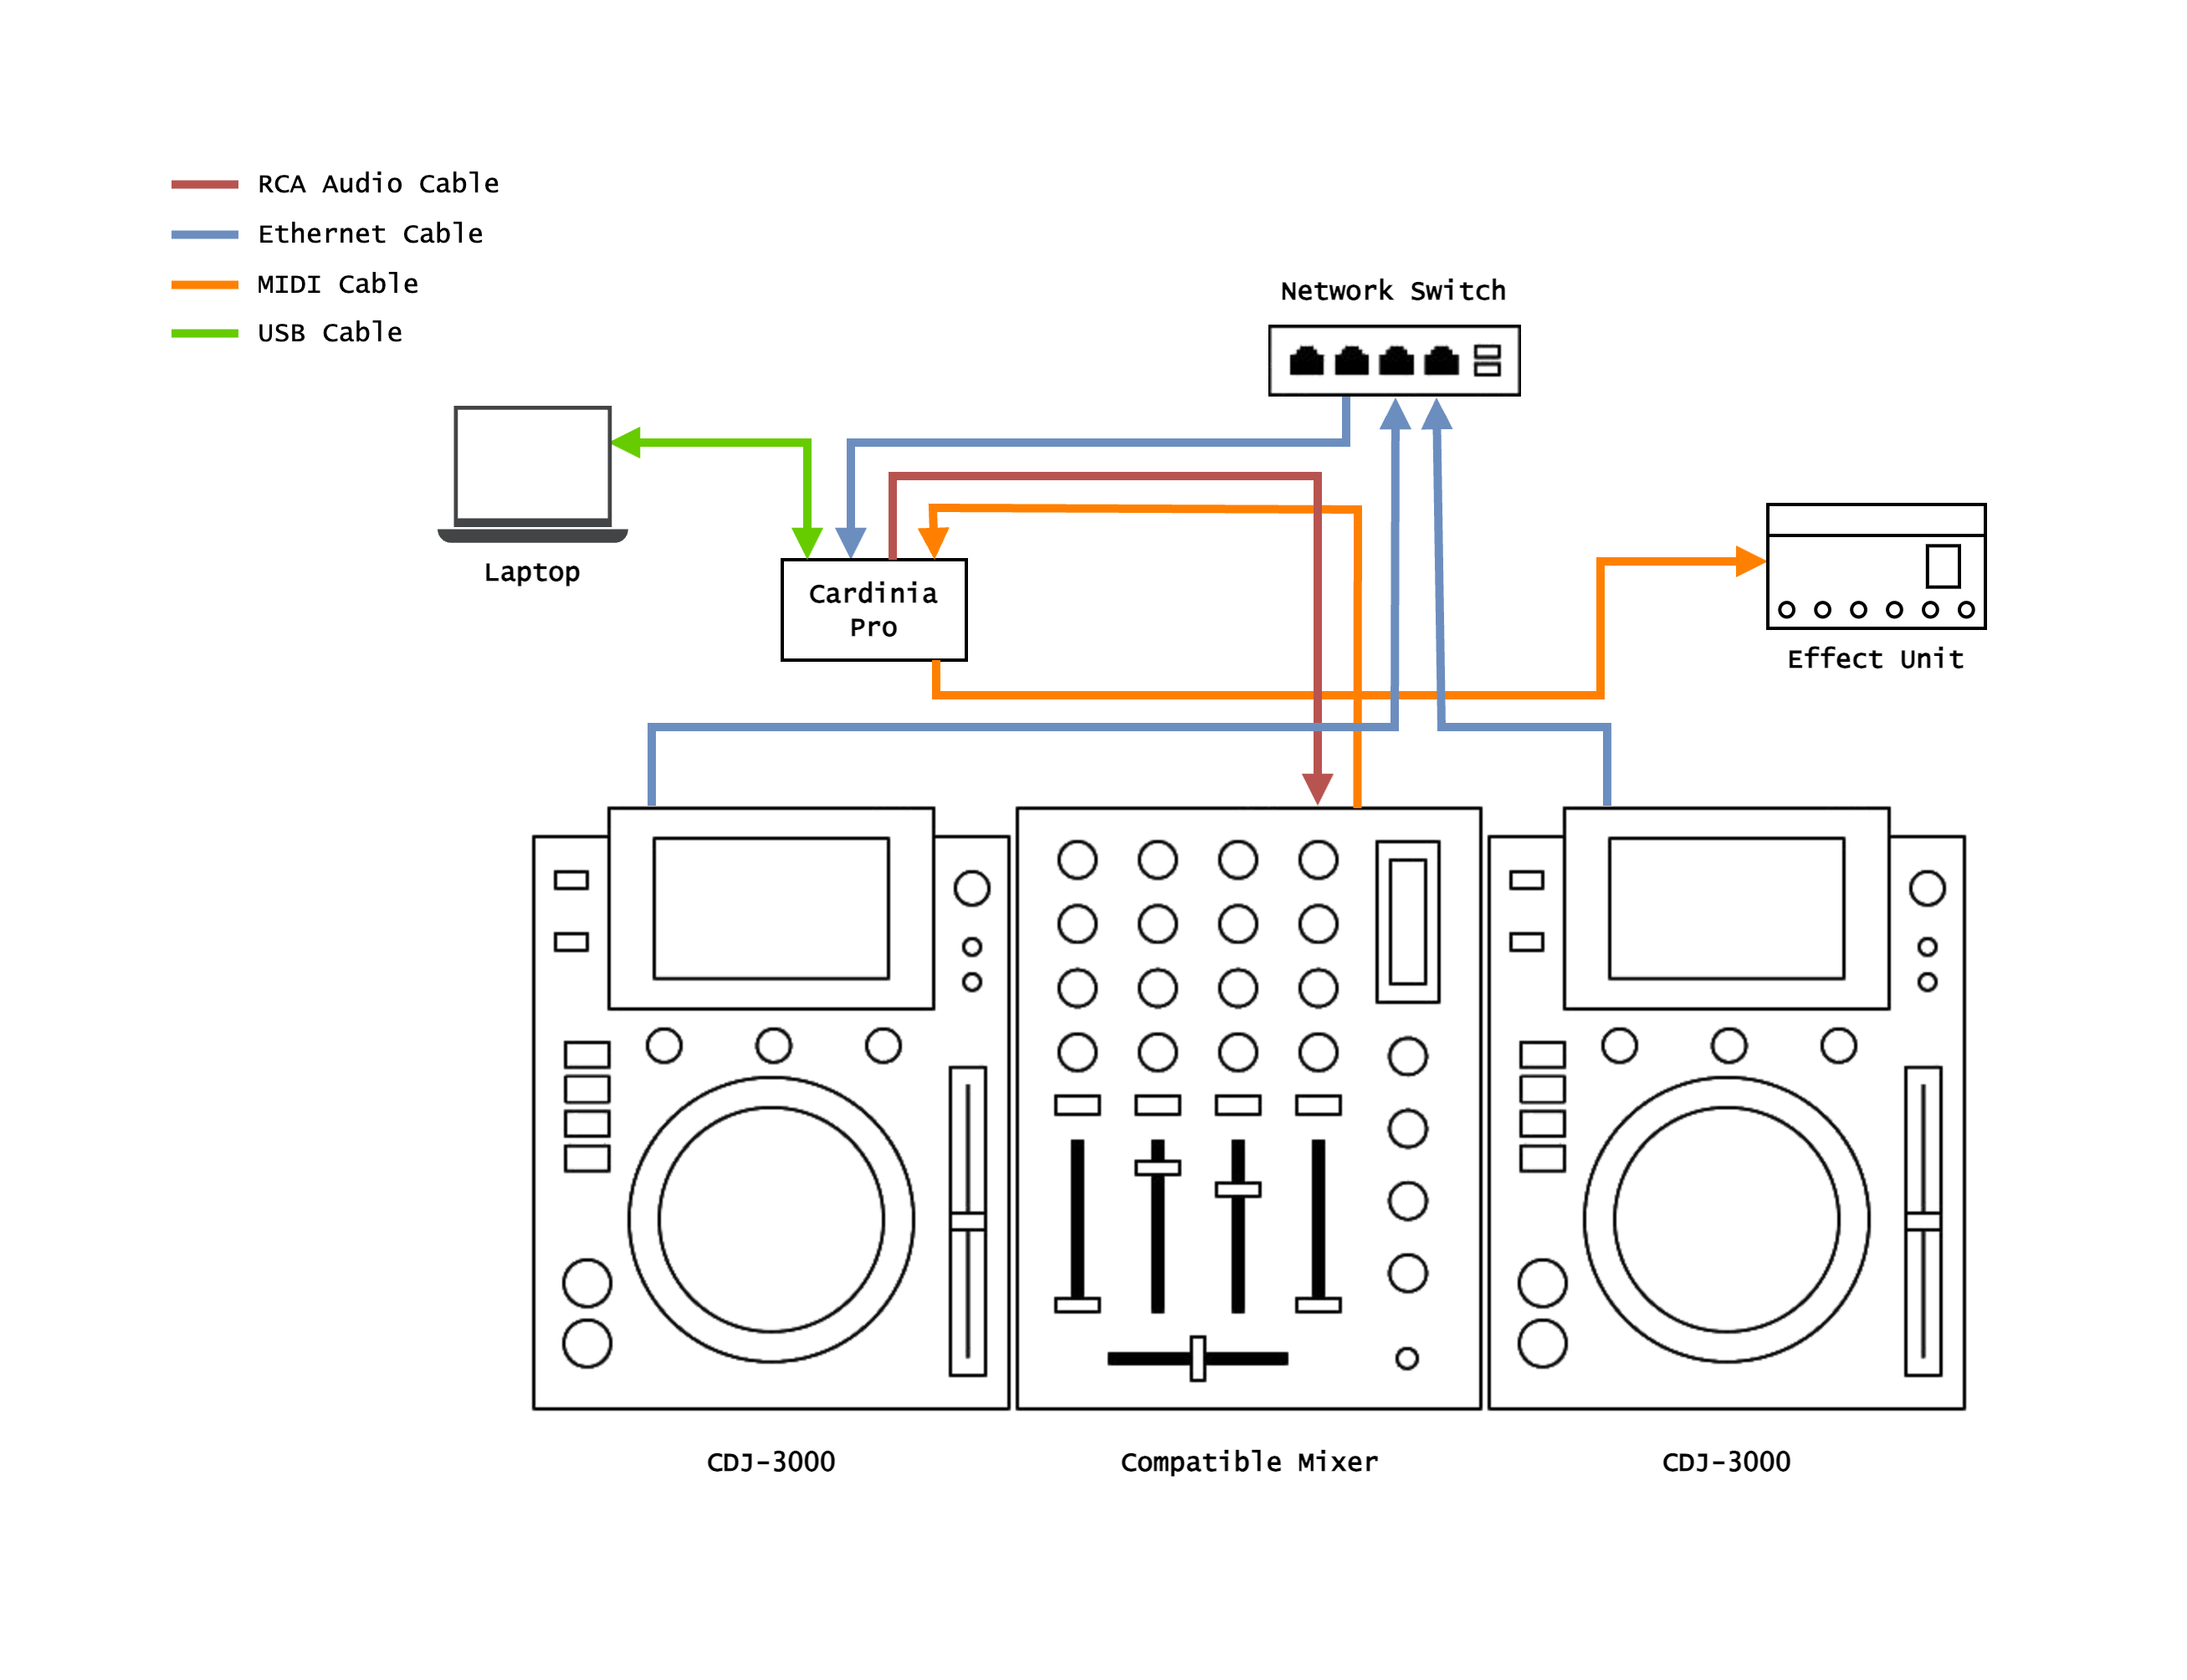
| Feature | Player | Mixer | Connection Diagram |
|---|---|---|---|
| Touch Cue/Preview | CDJ-3000X CDJ-3000 | Any (with spare RCA input) | 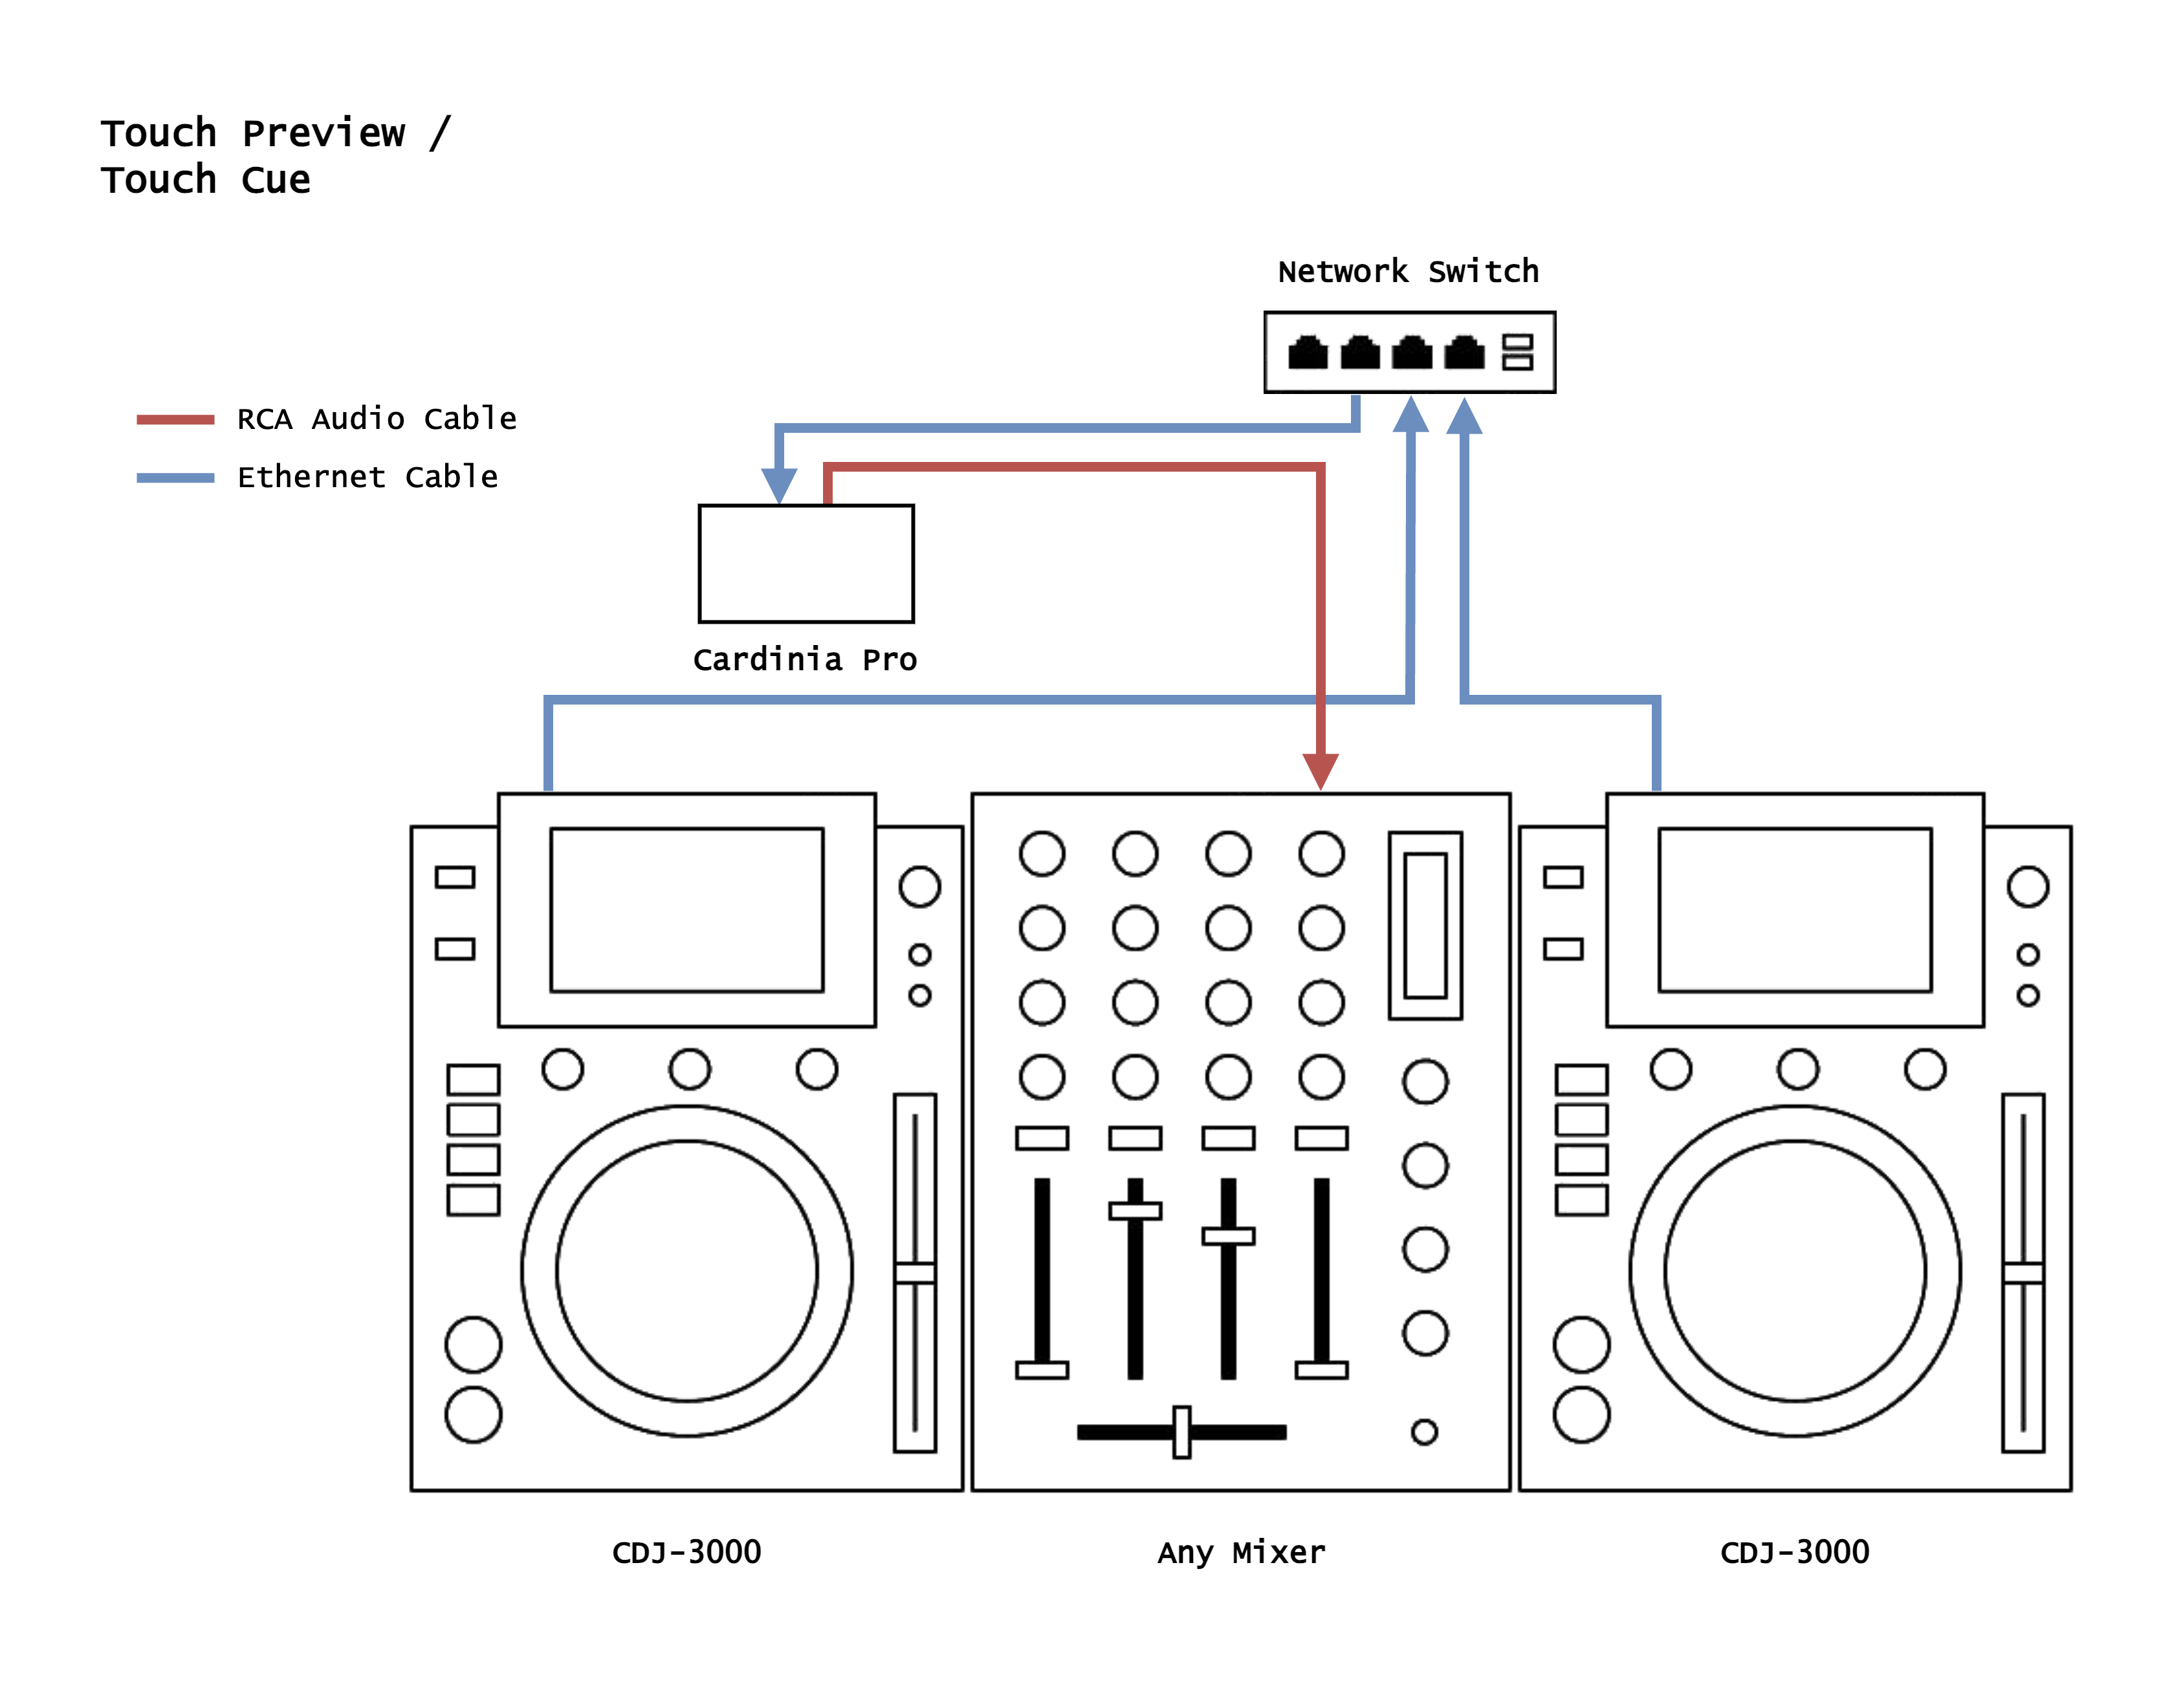 |
| On-air Deck Display | CDJ-3000X CDJ-3000 CDJ-2000NXS2 CDJ-2000NXS CDJ-900NXS XDJ-1000MK2 XDJ-1000 XDJ-700 | Xone 96 Xone PX5 | 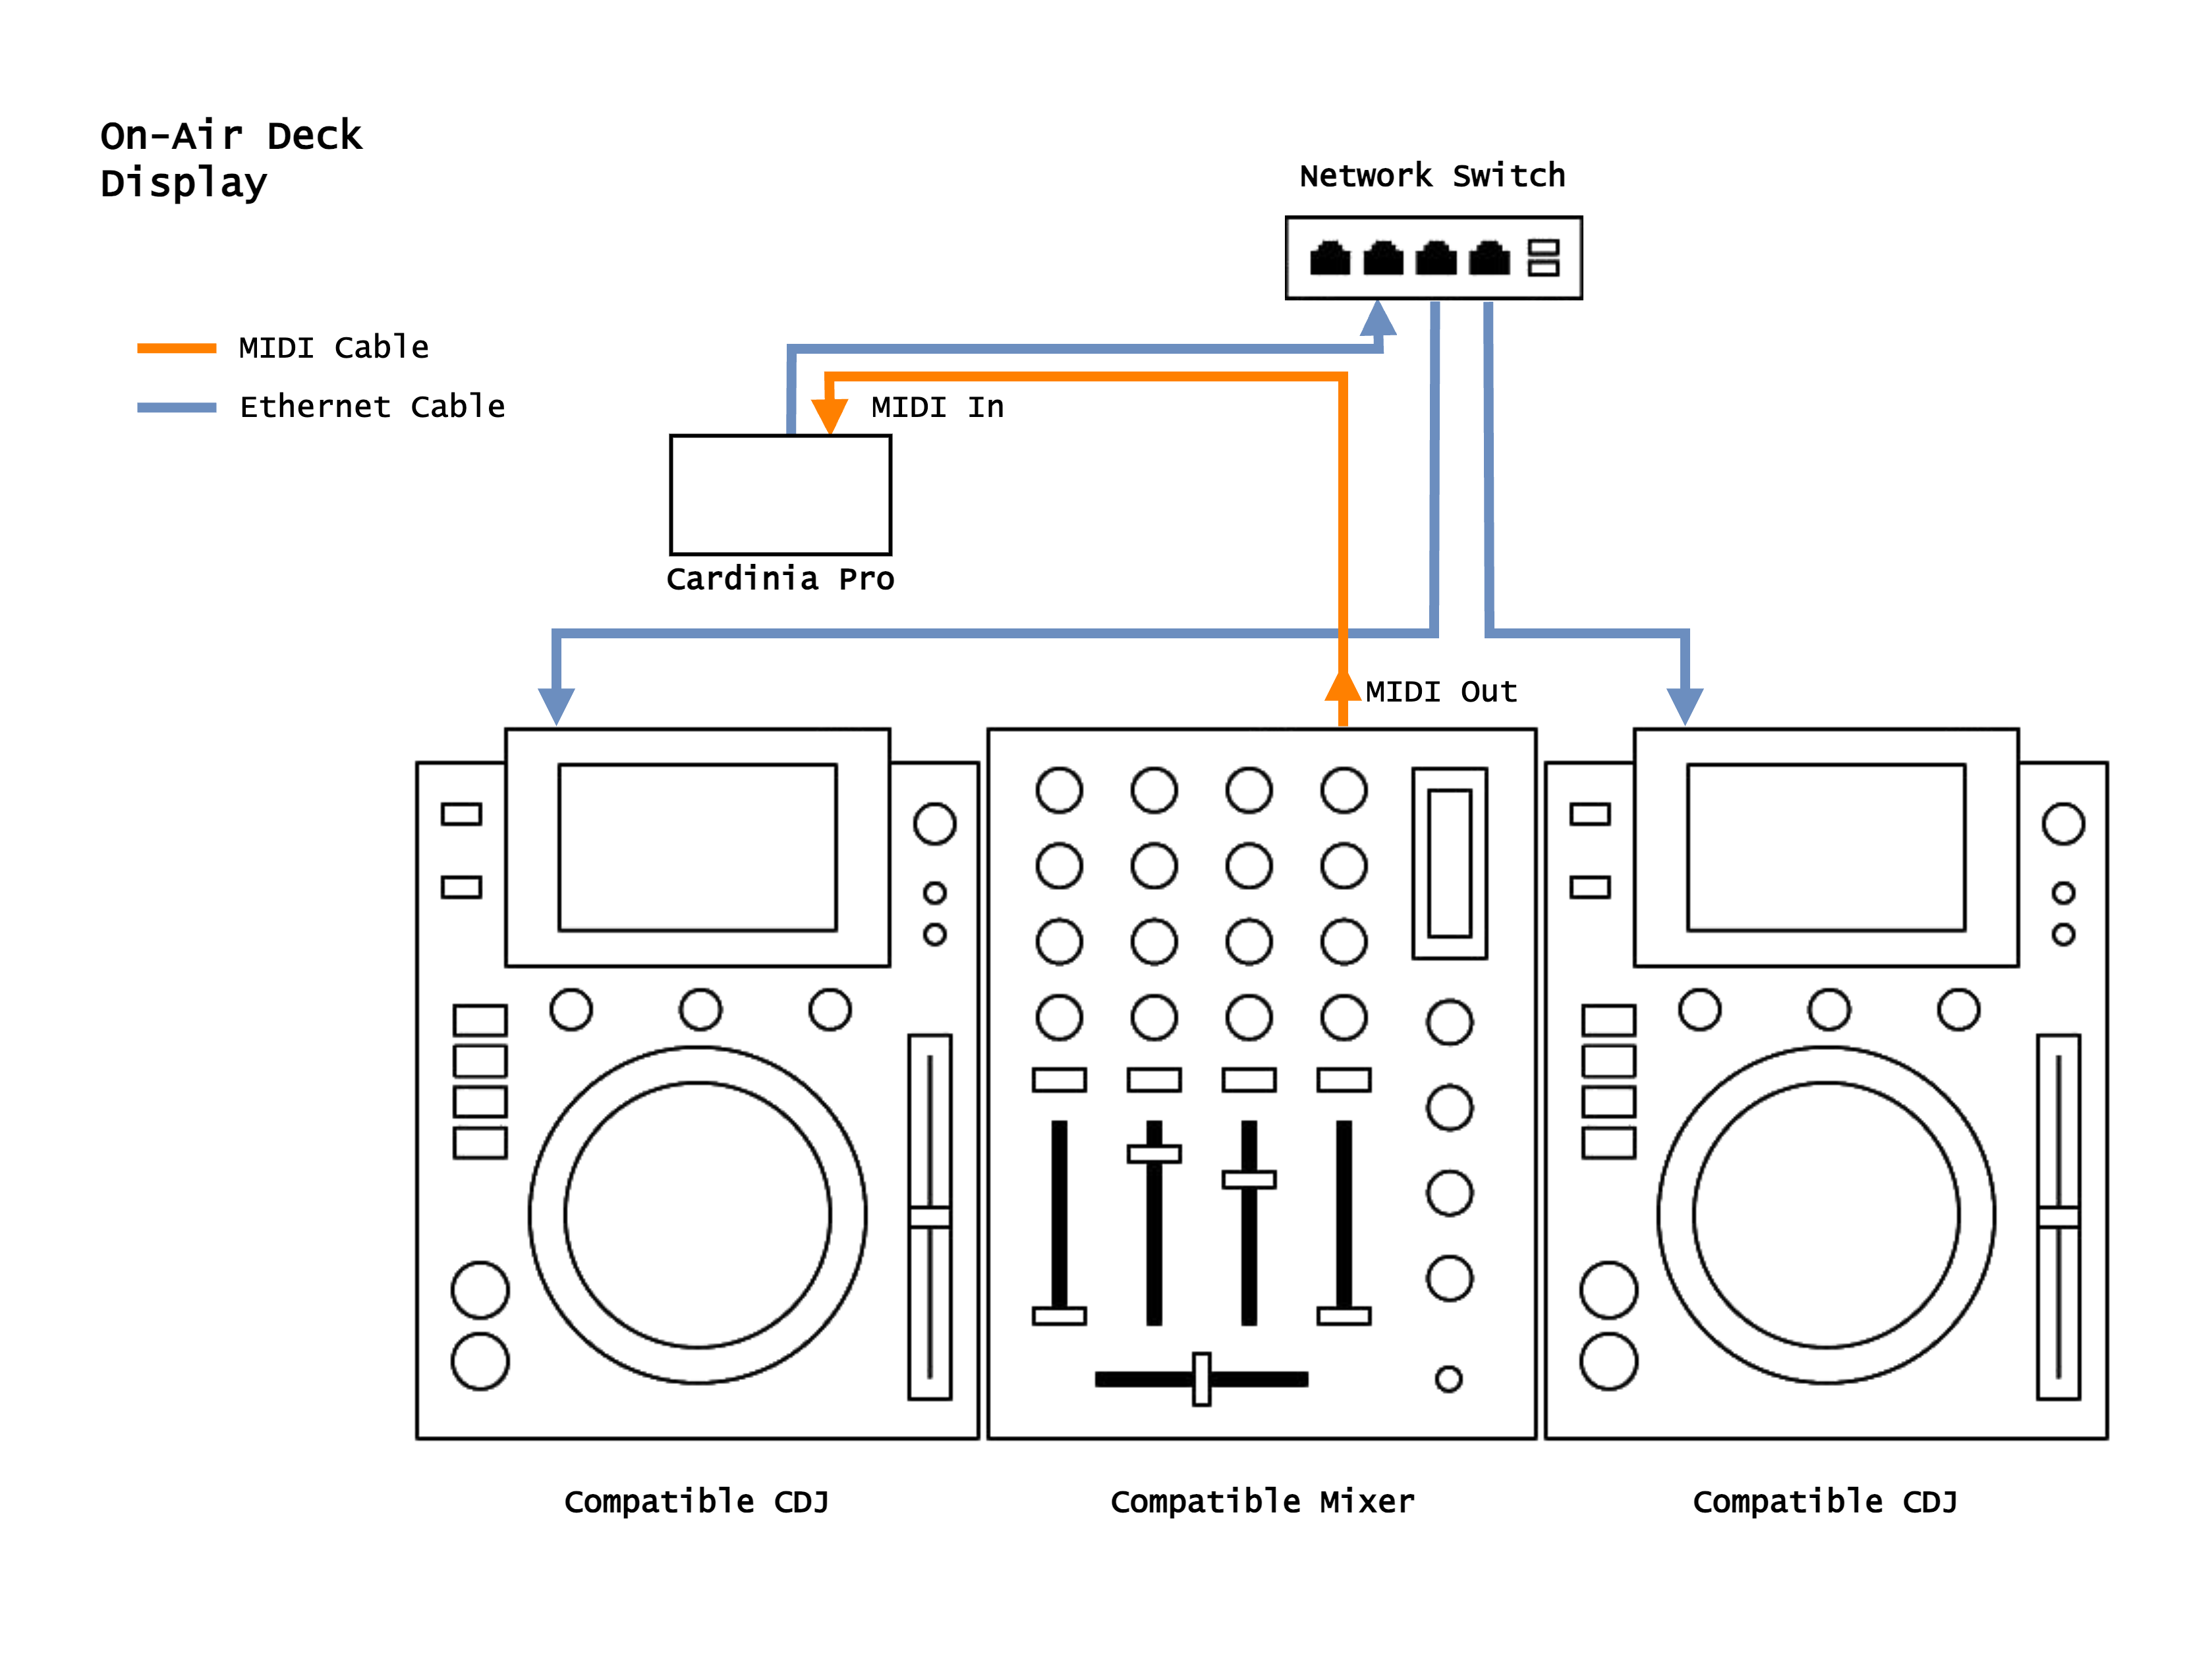 |
| Feature | Player | Effects Unit | Connection Diagram |
| Master Tempo Sync | CDJ-3000X CDJ-3000 CDJ-2000NXS2 CDJ-2000NXS CDJ-900NXS XDJ-1000MK2 XDJ-1000 XDJ-700 XDJ-XZ | Any (with MIDI input) | 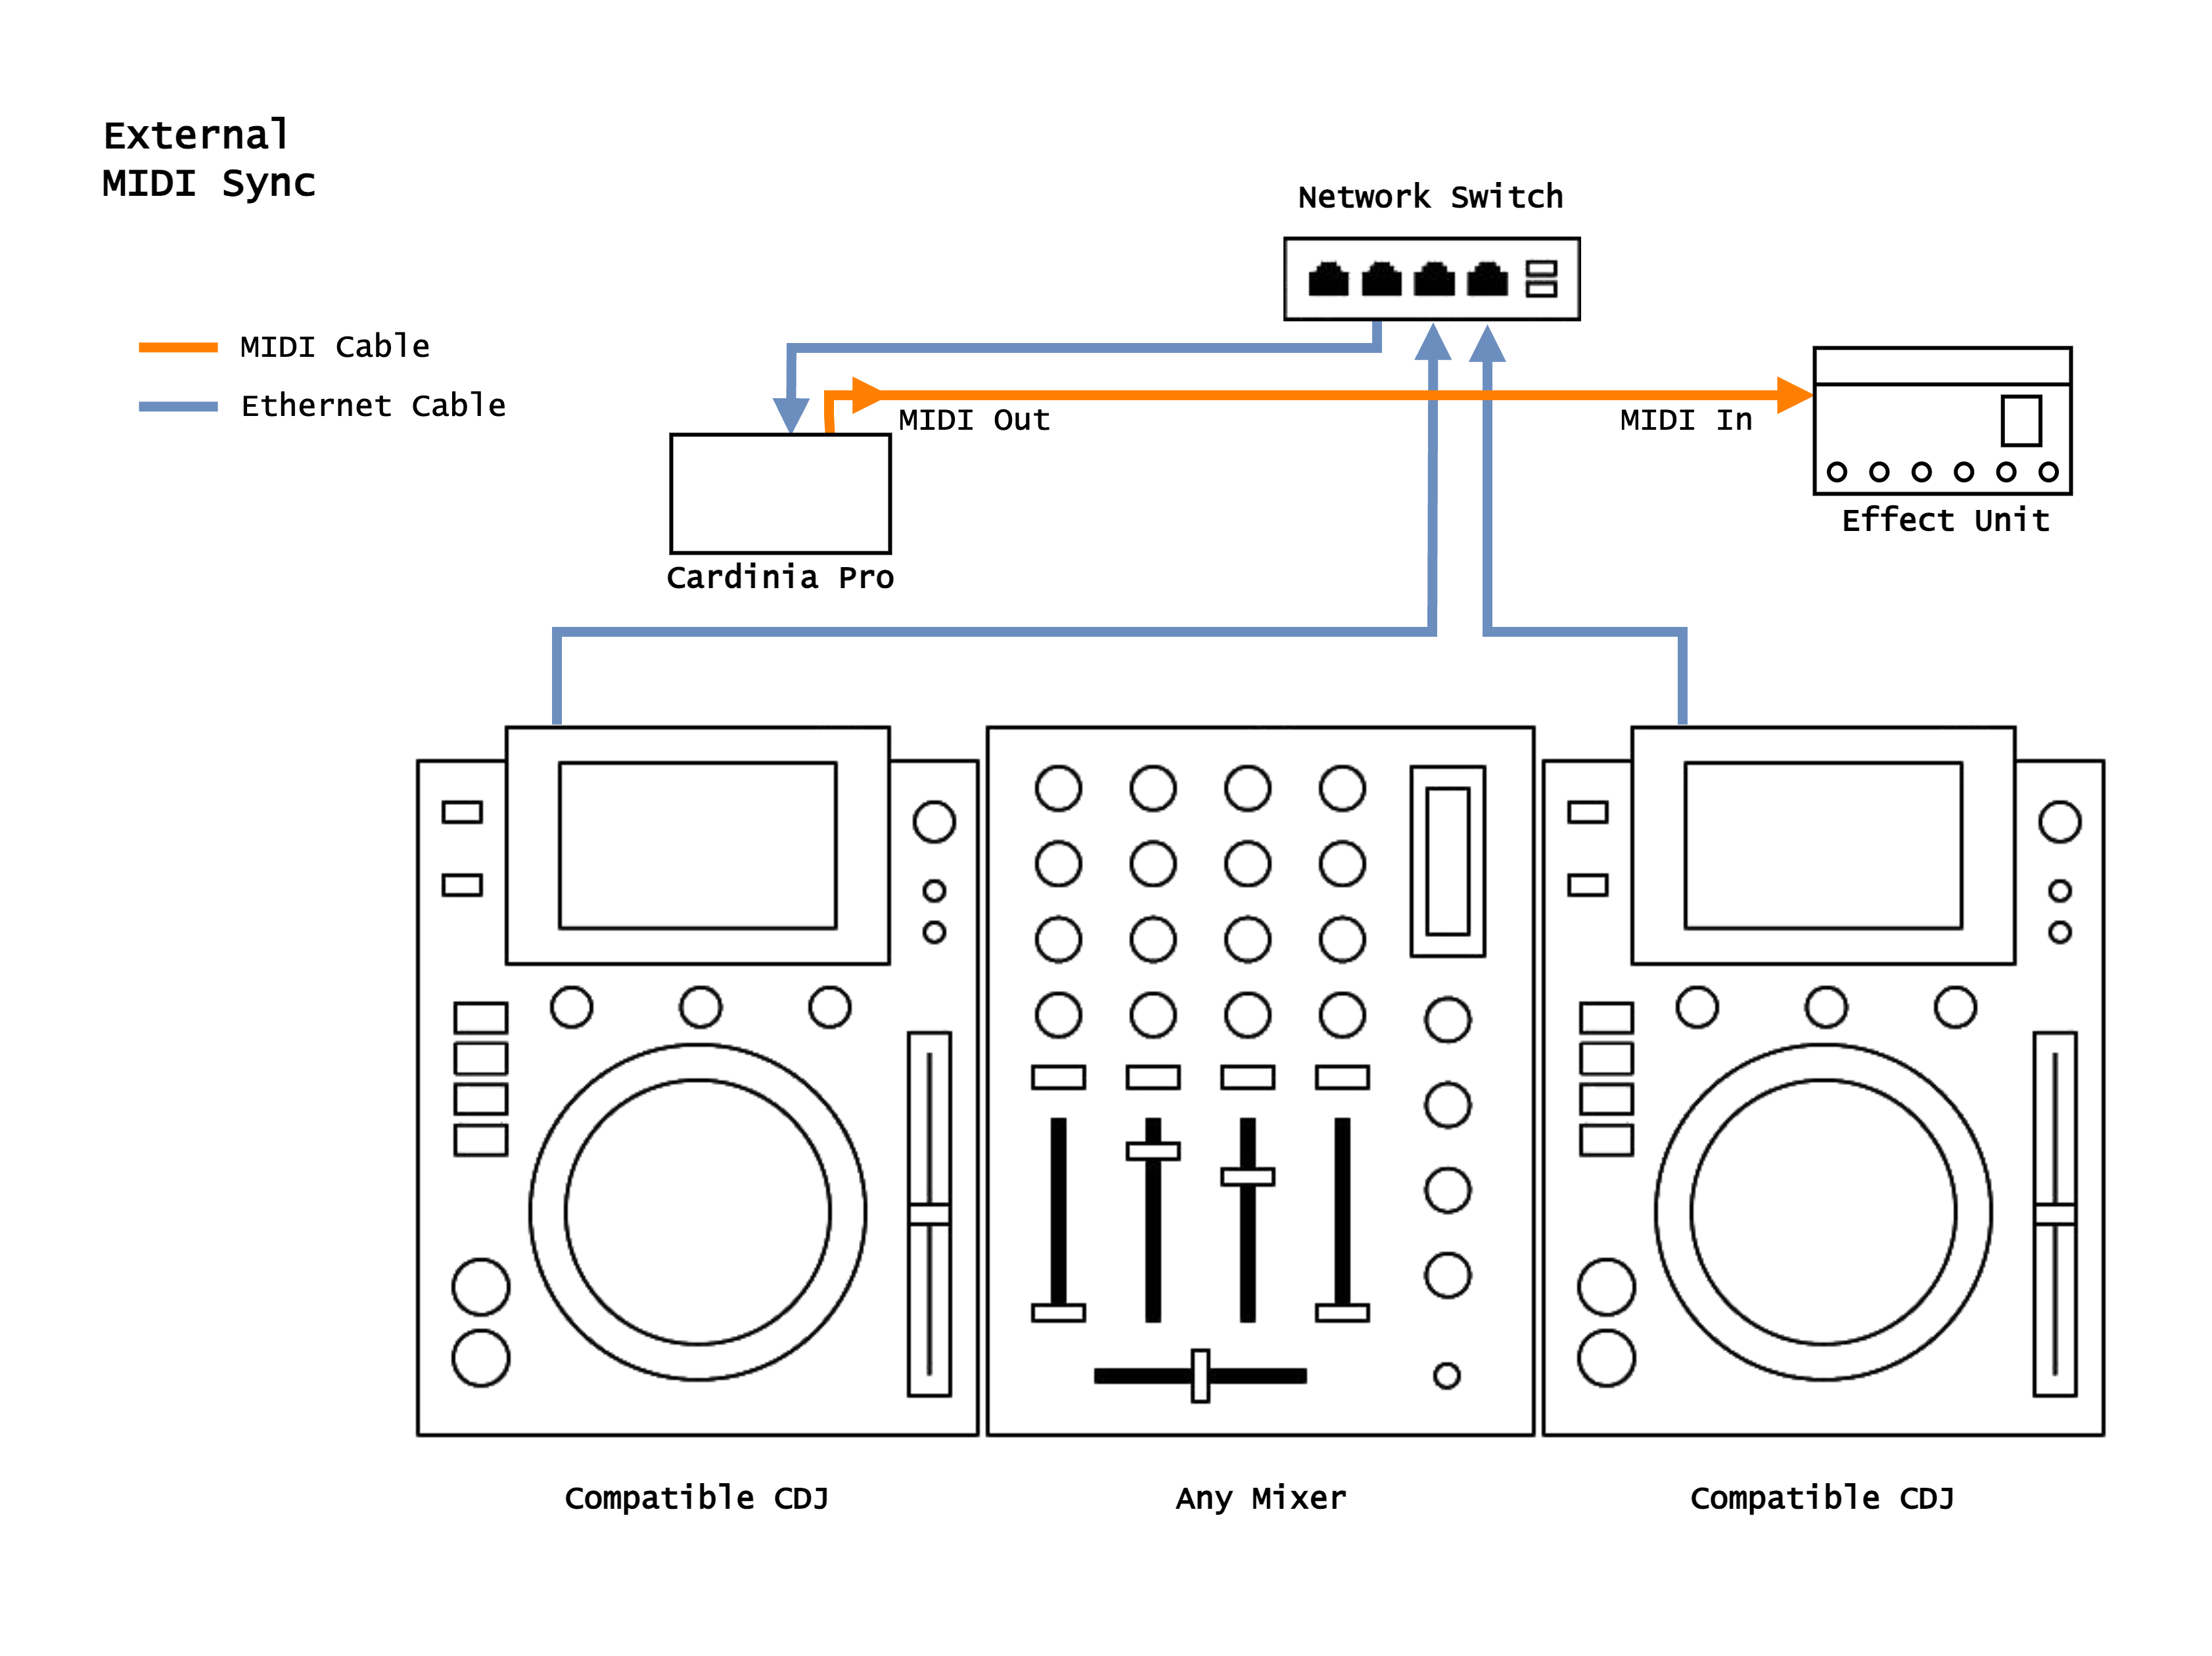 |
MIDI Router
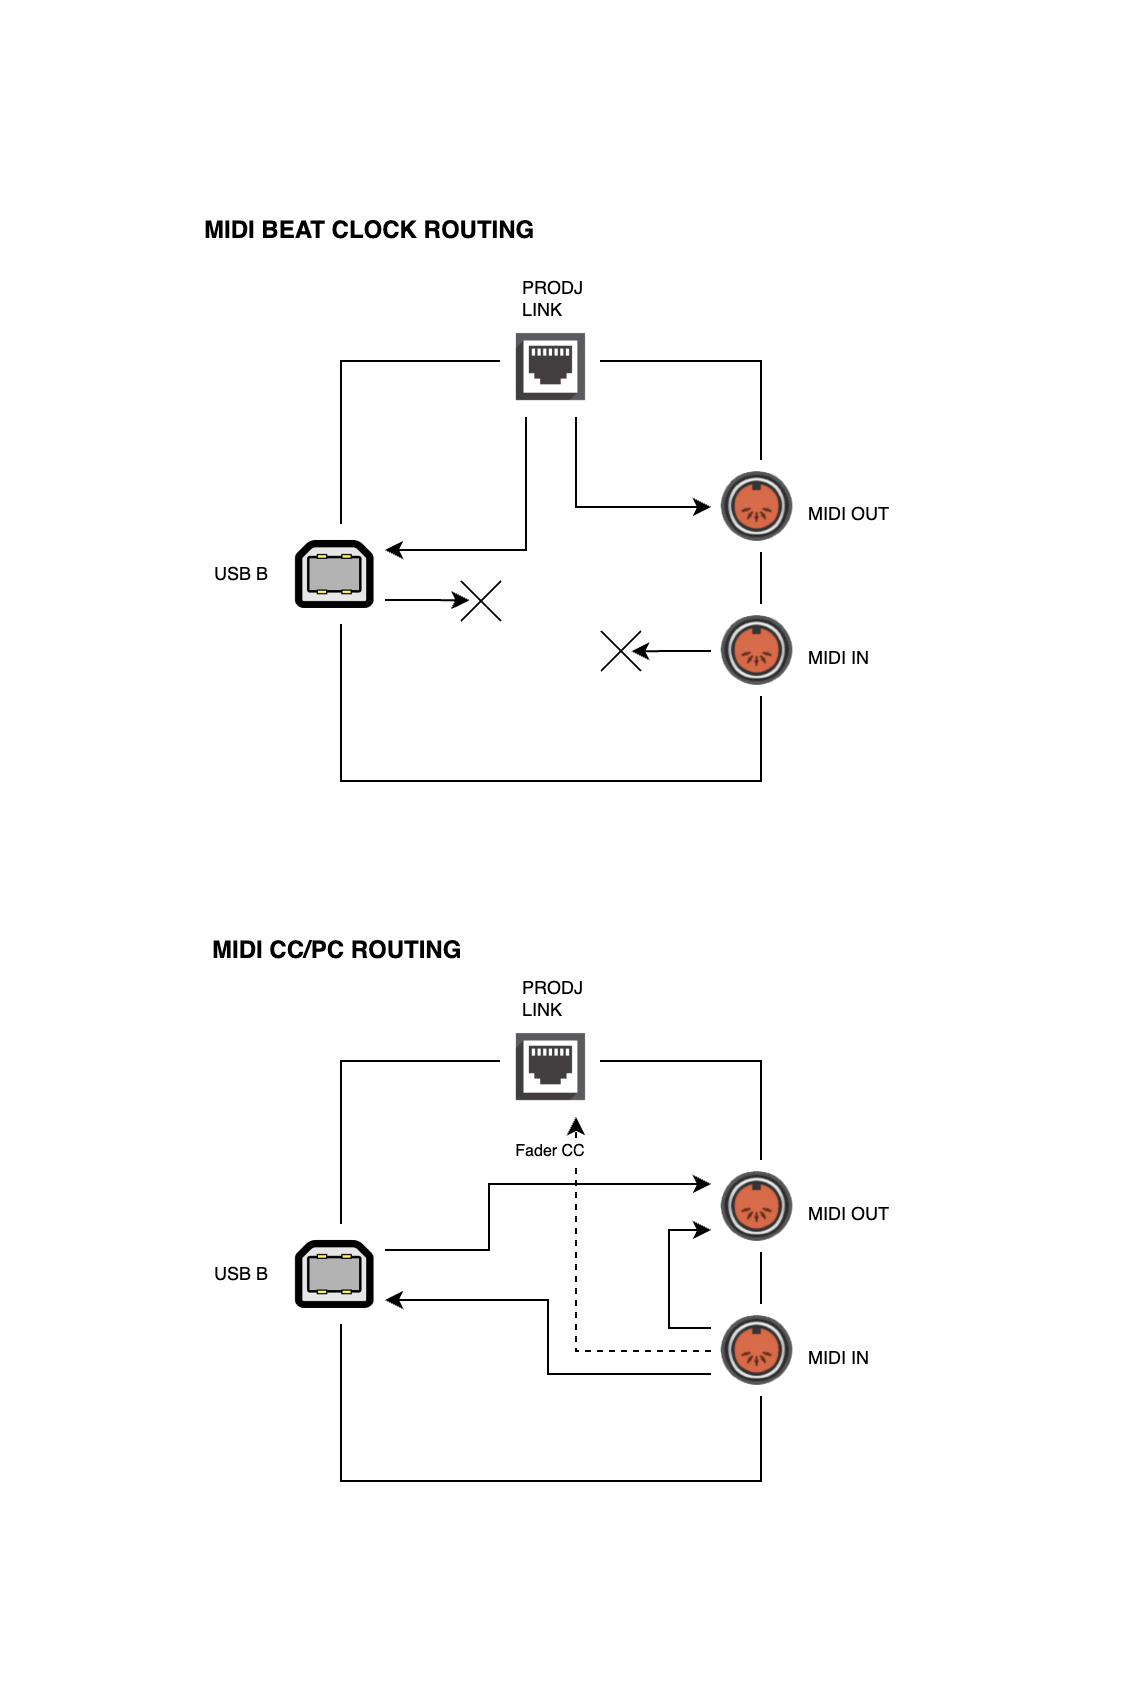
Beat Clock Routing
- MIDI Beat Clock (F8) is derived from the currently playing Master deck on the ProDJ Link network. It is sent to MIDI OUT and USB-MIDI ports.
- MIDI Beat Clock messages coming in from the MIDI IN or USB-MIDI ports are discarded.
CC/PC Routing
- MIDI Control Change (CC) and Program Change (PC) messages from the MIDI IN port are sent to the MIDI OUT and USB-MIDI ports.
- MIDI Control Change (CC) and Program Change (PC) messages from the USB-MIDI port is sent to the MIDI OUT port.
- Cardinia Pro will read CC fader messages from supported mixers for the On-Air Deck display feature. See Connection Diagrams section for supported mixers.
Auto-start With Re-Arm
Cardinia Pro can send MIDI Start (FA) messages to the MIDI OUT and USB-MIDI ports when armed.
Arming and Dis-Arming:
- Cardinia Pro can be armed and disarmed by pressing the FW button on the back of the unit.
- The MIDI LED on the front panel will light up solid GREEN when the unit is armed.
- The Cardinia Pro initially boots up in disarmed state.
When disarmed:
- Cardinia Pro will not send MIDI Start messages when disarmed. All master deck changes are ignored until armed.
When armed:
- A MIDI Start message will be sent when pressing CUE or PLAY on the master deck:
- If the playhead is lined up exactly on a beat, the MIDI Start message will be sent immediately.
- If the playhead is not aligned to the beat grid (i.e. is off grid), the MIDI Start message will be sent when the playhead passes the next beat grid marker.
If you find that the MIDI Start message is being sent 1 beat later than expected, check that the cue point is lined up exactly on a beat (and not slightly after).
If you repeatedly tap the CUE button (i.e. when trying to time the introduction of a player), Cardinia Pro will also send MIDI Start messages on each tap. This helps to sync your external device with the playback of a deck as you tap CUE. If you hold CUE (or press PLAY) such that the playhead passes the next beat grid marker, Cardinia Pro will latch playback and won’t send subsequent MIDI Start messages when tapping CUE.
Once the master deck is set playing, the only way to re-trigger a MIDI START message is to either:
- Stop the MASTER DECK
- Disarm and rearm Cardinia Pro by pressing the FW button
NOTE: If the master deck is already playing and the Cardinia Pro is set to armed, it will trigger a MIDI Start message to be sent when the playhead passes the next beat grid marker. This may not be what you want.
As an example, if the master deck is already playing and you want to sync up external gear with the next track, you should:
- Disarm Cardinia Pro by pressing the FW button so the MIDI light is turned off.
- Load the next track on a deck that is not master
- Set the BPM of the incoming deck to be the same as the master deck
- Ensure that the cue point of the next track is set directly on a beat grid marker
- Press the MASTER button on the incoming deck to transfer master status to the incoming deck
- Arm Cardinia Pro by pressing the FW button so the MIDI light is turned on
- When ready, tap the CUE or press PLAY button on the incoming deck. This should trigger a MIDI Start message.
This feature requires firmware v2.09 and higher.
On-Air Deck Display
On-Air Deck Display works by reading MIDI messages of the fader positions from supported mixers and sending the data via ProDJ Link to the corresponding CDJ.
The following table shows the supported mixers for the On-Air Deck Display.
| Mixer | MIDI Mapping |
|---|---|
| Xone 96 Xone PX5 | MIDI CHANNEL 16 |
The mixer must be connected to the MIDI In port of Cardinia Pro.
FAQ
Compatibility with NowPlaying2
NowPlaying2 is an excellent peice of software used by streamers to add track information to their live DJ streams.
Both Cardinia Pro and NowPlaying2 work by emulating a CDJ player on the ProDJ Link network as player number 7, which can lead to conflicts and prevent features from operating correctly.
To avoid conflicts, Cardinia Pro has the ability to announce itself as an alternate player (player number 8) via a DIP switch.
To do this follow the steps below:
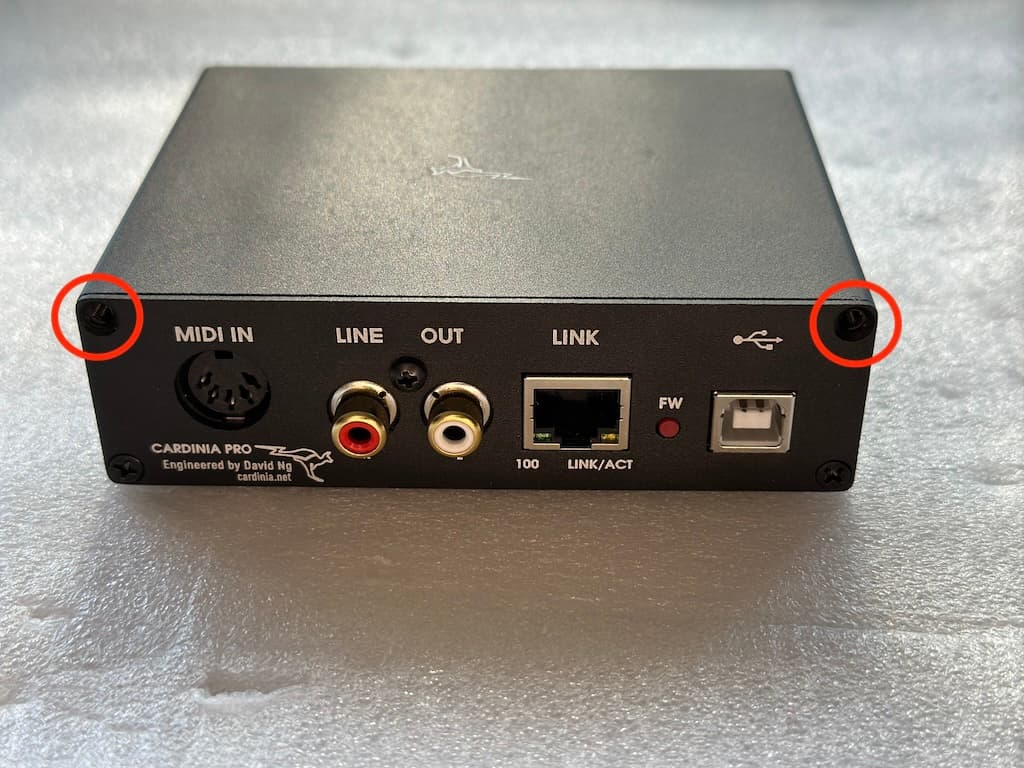
- Disconnect all cables from Cardinia Pro
- Unscrew the following 4 screws and lift off the top lid
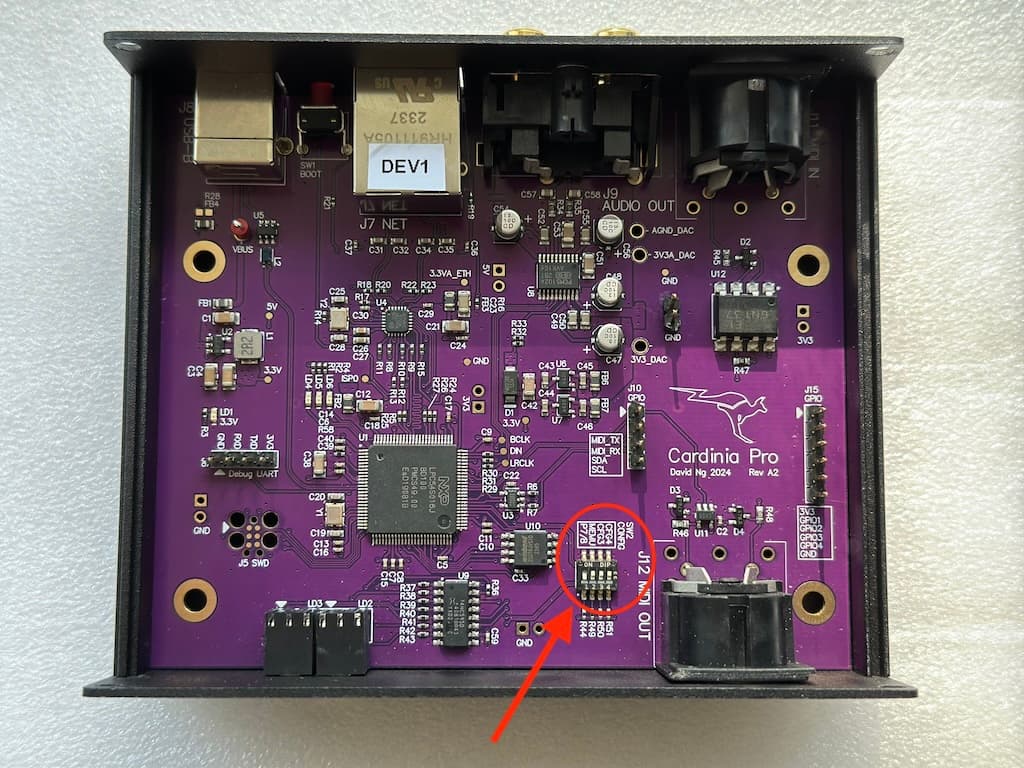
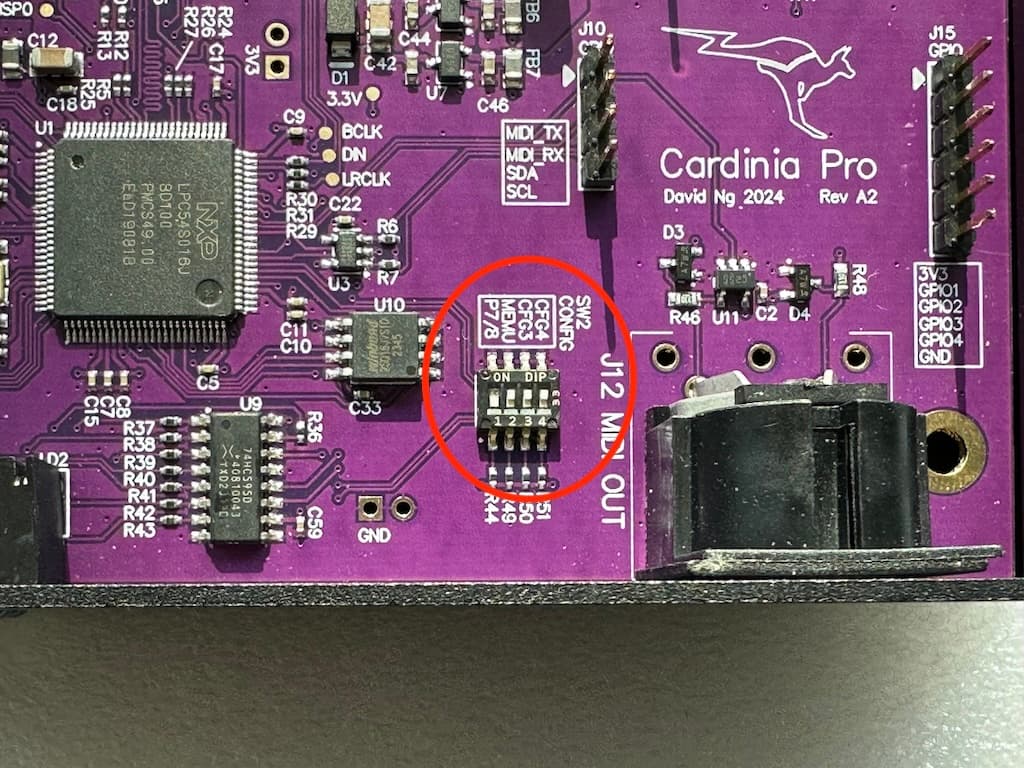
- Find the DIP switch labelled as SW2 towards the bottom right of the unit
- Using a toothpick or the tip of a pen, carefully flip the P7/8 switch (at position 1) to the OFF position
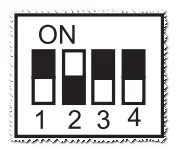
- The DIP switch should look like the following:
- Place the top lid back on the unit and screw back the 4 screws
- Re-connect Cardinia Pro to your setup
- Congratuations! Cardinia Pro is now operating as player number 8
Using Cardinia Pro as a ProDJ-to-MIDI converter in a Pioneer mixer setup
If you wish to use Cardinia Pro only as a ProDJ Link-to-MIDI converter together with a ProDJ Link enabled mixer (including the XDJ-XZ), you should disable Mixer Emulation on Cardinia Pro.
This prevents potential conflicts on the network, but will disable the Touch Cue feature on the Cardinia Pro.
To do this follow the steps below:
| Picture (click to expand) | Explanation |
|---|---|
  |
|
 | - Find the DIP switch labelled as SW2 towards the bottom right of the unit |
 |
 |
|
What USB power source can I use?
Cardinia Pro requires 5V and takes less than 500mA, so any standard 5V USB charger/source should work.
You can also power the device from a USB port on your CDJ or laptop (the USB port also sends USB-MIDI clock to your laptop).
Open Source
Parts of Cardinia Pro are published open source.
See https://github.com/nudge/cardinia.
Portions contributed to the awesome dysentery project.
Firmware Downloads
Devices come preinstalled with firmware version v2.09.
Firmware updates will appear here as they become available.
v2.09 - 22-Mar-2025, download: [macOS | windows]
- MIDI: Improve MIDI DIN parsing.
- MIDI: Tighten up MIDI auto-start timing.
- MIDI: Add MIDI auto-start automatic re-trigger support.
- On-Air: DIP CFG3 switch, disable on-Air.
- On-Air: DIP CFG4 switch, mixer type.
v2.08 - 09-Mar-2025, download: [macOS | windows]
- MIDI: Add MIDI start re-arm support via FW button.
v2.07 - 01-Mar-2025, download: [macOS | windows]
- MIDI: Send MIDI start message when master player first starts playback.
- MIDI: Increase MIDI buffer sizes.
v2.06 - 22-Feb-2025, download: [macOS | windows]
- MIDI: Improve handling of MIDI SysEx messages.
v2.05 - 09-Feb-2025, download: [macOS | windows]
- MIDI: Improve USB MIDI implementation.
v2.02 - Initial release
Questions?
Have questions or have some feedback? Feel free to contact us using the contact form.